Sequences is a powerful tool that gives your team a centralized way to manage multi-step engagement. From email campaigns, to reminders and task notifications, Sequences will allow you to track customer interactions from start to finish.
What is sequences?
Sequences gives you the ability to build out a customer interaction flow from start to finish that is automated. It can include automatic emails, manual emails, tasks, and phone calls. When you designate any manual tasks, you will be notified when it's time to complete them.
Open Sequences
You can access Sequences in two different places. Where you access Sequences will determine which sequences you see.
1. Account level. To view all Sequences on your CRM account, open Sequences from the lefthand navigation menu. At the top of the menu, you will find "Sequences":

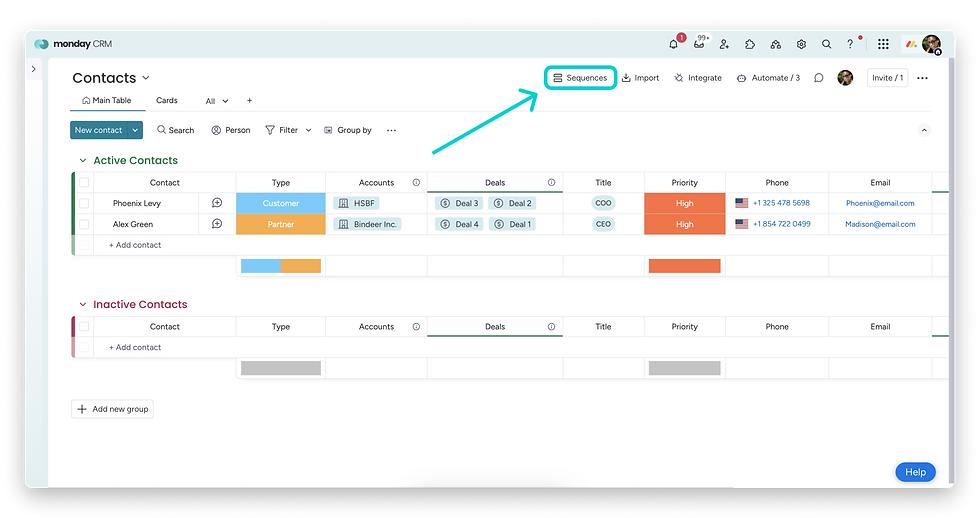
2. Board level. You can also view sequences on the board level through the Contacts and Leads boards. If you are an individual team member who owns your own accounts, this is a great way to keep track of the Sequences that you are responsible for. To view all Sequences related to a board, open the board, and select "Sequences" at the top of the board:
Build a Sequence
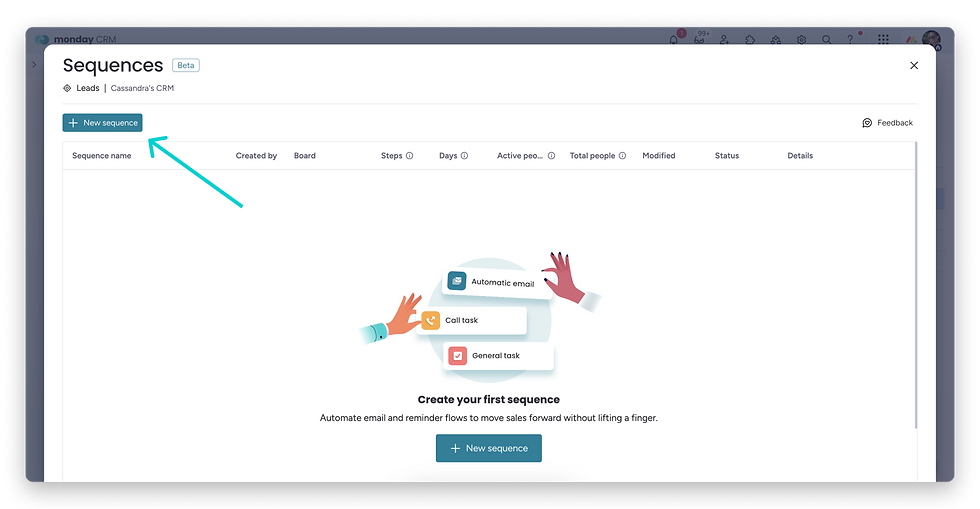
Once you've opened Sequences, you can build a new sequence by clicking on the "+ New sequence" button at the to left:
Begin by naming your Sequence. This is the name that your team will use to apply the Sequence. It's best to choose a name that is clear, concise, and unique.

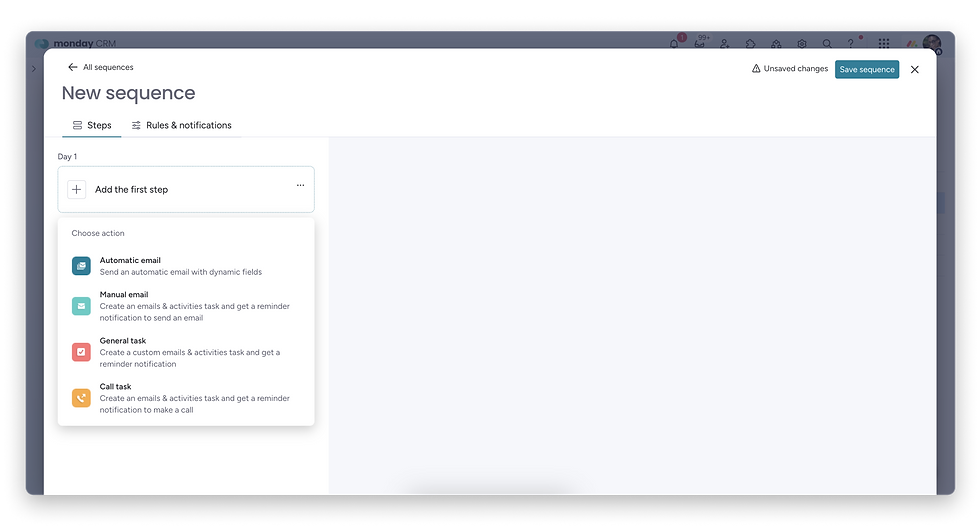
Next, choose a building block from the menu on the left. You have four options:
Automatic emails. These are emails that are automatically sent based on the schedule and conditions defined in the sequence. These emails use dynamic fields to customize the content.
Manual emails. Create an Emails & Activities task and get a reminder to send an email.
General tasks. Create a custom Emails & Activities task and get a reminder notification at the designated time. These can include any non-email actions that need to be performed manually.
Call tasks. Create an Emails & Activities task to make a call and get a reminder at the designated time in the sequence.
Delay steps. These control the timing between actions, ensuring that steps occur in the desired order and timeframe.
Order the steps
As you add steps, you can define when the step will happen. If a task must be completed on day 3 of the Sequence, you can make that adjustment by clicking on the step and adding the day number in the top right corner:

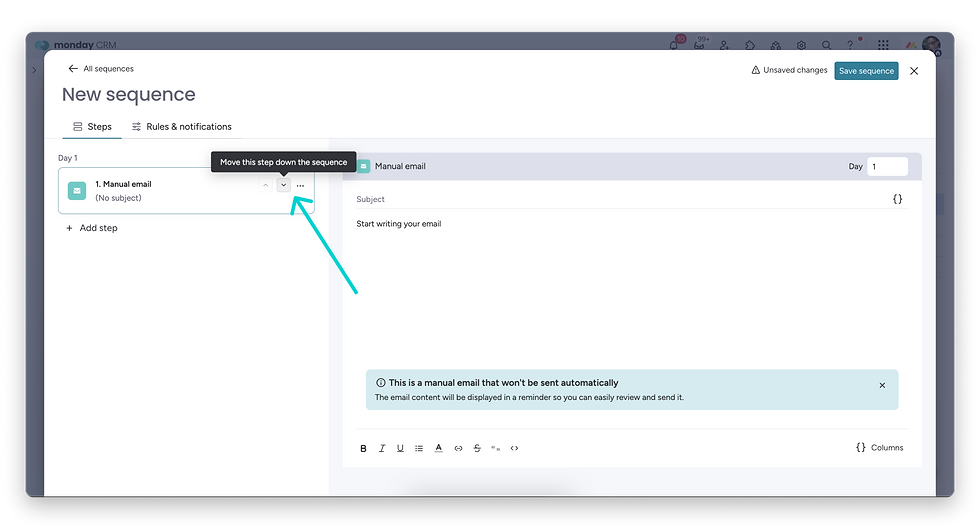
To move a step up or down in a sequence, use the up and down arrows on the right:
You can also delete or duplicate a step using the three-dot menu on the right:

Save your draft
Once you're done building the steps, you can save a draft of your sequence. It will be inactive until you complete the "Rules & notifications" which are discussed later in this article.

Composing emails
You can set up manual or automated emails within your sequence. Emails are composed and sent using Emails & Activities. You'll notice that the email composer is structured in the same way. You can compose text, edit text, format it, and include links.
Manual emails
When composing a manual email, keep in mind that it can be customized before it's sent. The subject line will appear on the left to help you keep track of the steps within your Sequence.

Automatic emails
You can customize the email as much as you want. Because the email will be sent automatically, it can be helpful to use dynamic fields to personalize the email. To insert dynamic fields into your email, use the "{}" symbol. If you choose to use dynamic fields, you can pull in data from any column on your board.

Your email drafts will be saved automatically within the Sequence.
Note: At the moment, the following are not supported in Sequences-- email templates, HTML, and files/attachments.
Rules & notifications
Open the "Rules & notifications" tab to finish setting up your sequence. There are several customization options for configuring your Sequence.
Sequence activation & sequence data
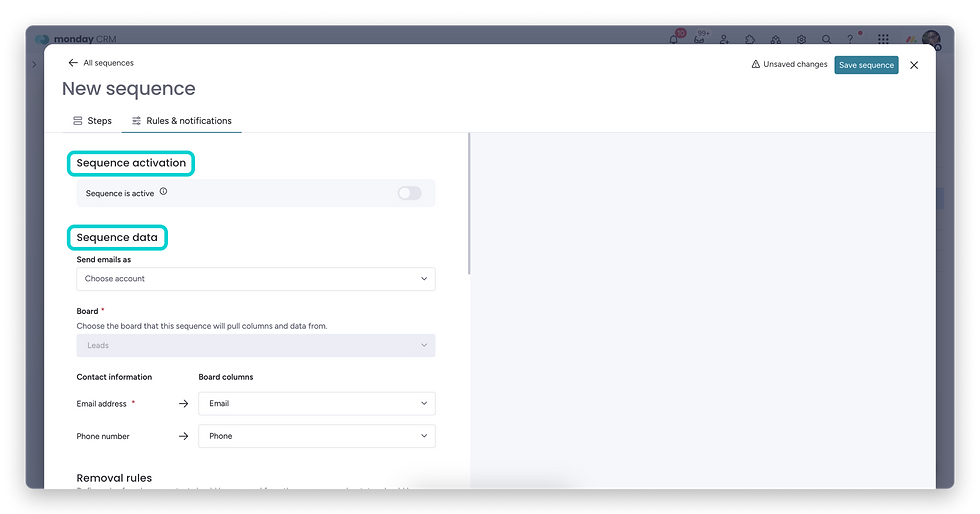
At the top you will see:
Sequence activation. When you're done completing the other configuration steps, toggle this on to activate your sequence. You can also use this to deactivate your sequence.
Next, you'll see the Sequence data section. You can make the following designations in this section:
Send email as. This is where you designate which email address the emails in your sequence will be sent from.
Note: You will only be able to select email inboxes that you, as the Sequence creator, own or inboxes that are shared with everyon on the account.
Board. Choose the board where this Sequence will pull data from. You'll likely want to choose the Contacts or Leads board.
Contact information. Choose which columns on your board to use for pulling in the email address and phone number.
Removal rules & Time zone

In the next section, you will see Removal rules. This is where you designate which conditions must be met in order for a contact or lead to be removed from the Sequence. You can apply as many rules as you want. Toggle the rule on to apply it to your Sequence.
The options are:
Remove contact if they reply to an email in this sequence.
Remove contact if they open an email in this sequence.
Remove contact if their email bounces.
When you choose any of these options, you will also have the option to select a Status column on the board indicated in Sequence data and change that status to a specific label.

The next section is where you will indicate the Time zone and send window for your automatic emails.
Time zone. This is the time zone that the following day and time rules will align with.
Send message on these days. You can choose to skip weekends or any other day of the week. When a day is highlighted in teal, it is selected.
Send message at this time. You can choose a window of time during which your emails will be sent.
Notifications

In the last section, you can choose your Notifications settings. You have the following options:
Notify me when it's time to make a call / send an email. By default, this option will be toggled on.
Notify me when a sequence ended due to engagement. This refers back to the rule in the Removal rules section. If you indicate that you'd like someone to be removed if they reply or open an email, you can toggle on this notification rule so that you're notified when this occurs.
Notification recipient. If you toggle on notifications in this section, this allows you to choose who will be notified. If notifications are toggled on, you must choose a People column from the board designated in the Sequence data section. If someone isn't assigned in the People column, the Sequence creator will receive the notification for that individual contact or lead. If the notifications are toggled off in this section, no People column needs to be selected.
Activate a sequence
When you're done building your sequence and customizing the Rules & notifications, click "Save sequence" in the top right. You will be redirected to the Sequences manager.
There, you can open the three-dot menu to the right of your Sequence. If your Sequence is missing data, you can choose "Fill in missing data" to complete the sequence:

Once your data is complete, you can activate the sequence from the Sequence manager:

Or you can activate it from the Sequence Rules & Notifications tab:

Enroll a lead in a sequence
Once the sequence is active, you can manually enroll contacts and leads. You can also set up an automation to automatically enroll incoming leads or newly created contacts.
Manual enrollment
Method #1:
To enroll a lead in a sequence, open your Sequence and then open the People tab.

Using the button at the bottom of the screen or the button at the top left, click to enroll a lead in your sequence:
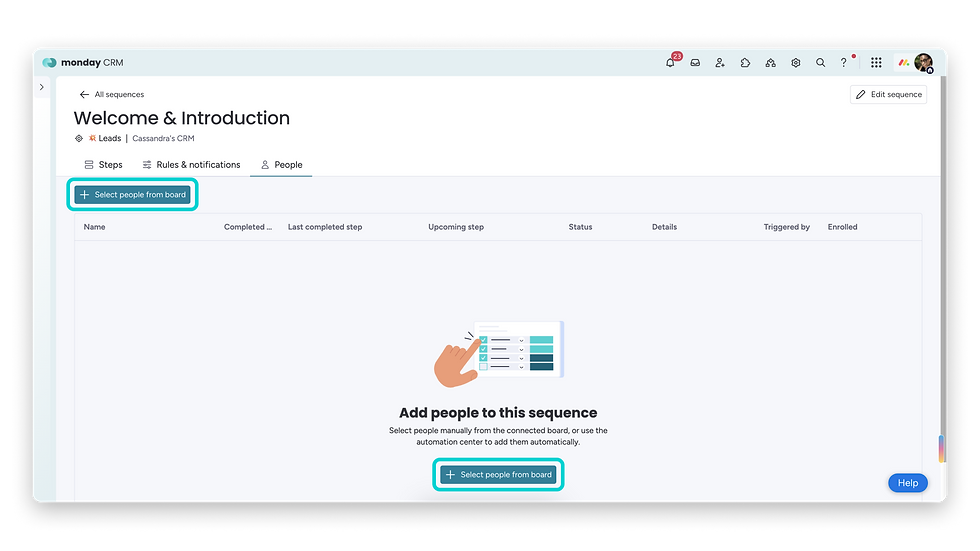
Follow the prompts to enroll your lead.
Method #2:
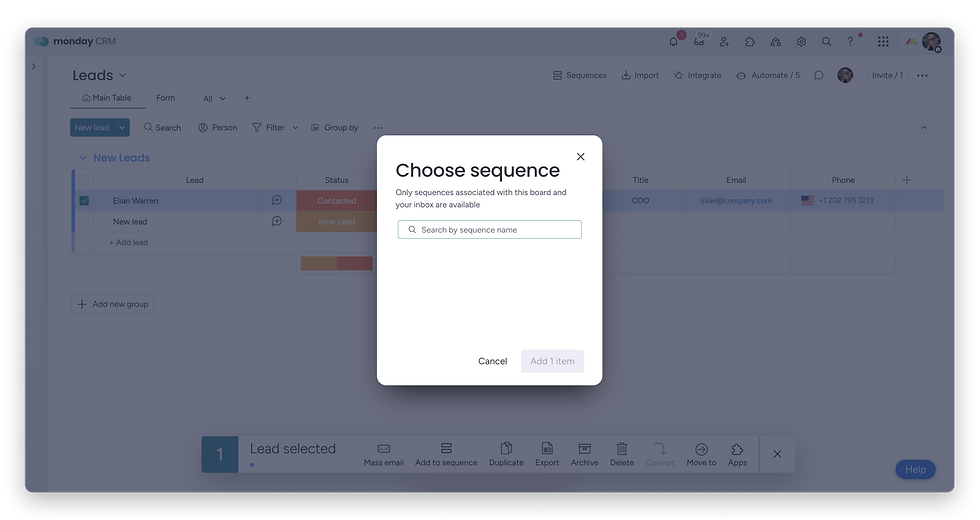
You can also enroll a lead or a contact directly from your boards. To do this, go to your board and check the box to the left of the item that represents the lead or the contact that you want to enroll. You can select multiple items. This is called Batch Actions. Check out the "Batch Actions" article to learn more about this.
In the pop-up at the bottom of the screen, select "Add to sequence":

Then, you will see a list of sequences available to you. When using manual enrollment, you will see:
sequences that you own
sequences that your email address is connected to
and sequences that are connected to an email address that has been shared with you or with the entire account
Choose a sequence to apply it:
Automatic enrollment
To automatically enroll incoming leads and newly created contacts, you can create an automation with the Sequences app. Click Integrations at the top right of your board:
Search "sequence" to quickly locate the app:

Search "sequence" to quickly locate the app:
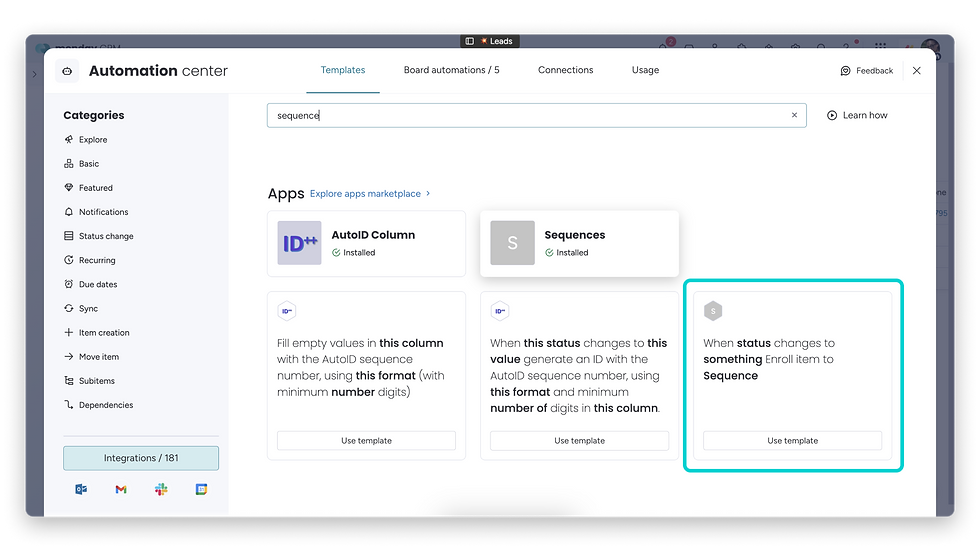
Use the "When status changes to something, Enroll item in Sequence" template to automatically enroll leads or contacts in a specific Sequence. For example, you might use, "When status changes to Interested" as the trigger. Every time a lead is marked as "Interested", they'll be enrolled in your designated sequence.
When choosing a sequence for your automation, you will see:
sequences that you own
sequences that your email address is connected to
and sequences that are connected to an email address that has been shared with the entire account
Complete the automation set up and save to apply it going forward.
Tracking Sequences
Once a Sequence is active and contacts or leads have been enrolled, you can track the Sequence in three places-- the Sequences manager, the People tab, and the Emails & Activities timeline.
Sequences manager
Here, users can see the status of the Sequence, total number of contacts enrolled in a Sequence, how many are active, and how many have completed the Sequence:
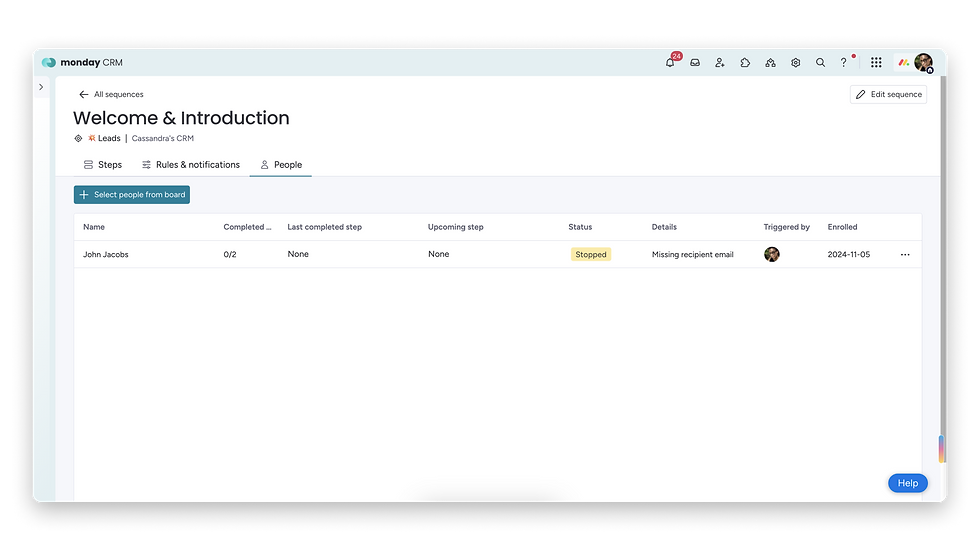
On this tab you will see the name of the lead on the left followed by 7 columns. The columns give you the following information for the lead:
Completed steps. This gives you a simple summary of how many steps have been completed. In this example, we can see that 0 out of 2 steps have been completed for this lead.
Last completed step. This shows you the last step in the flow that was completed for this lead.
Upcoming step. This shows you the next step in the flow that will occur for the lead.
Status. If there's an issue with this run of the sequence, you'll see it here. In this example, the sequence has a yellow label that says "Stopped".
Details. In this column you'll see any relevant details about the status of the run. In this example, we can see that the sequence was "Stopped" because we're "Missing recipient email" on the Leads board.
Triggered by. Here you will see the avatar of the team member who added the lead to the sequence.
Enrolled. This shows you the date that the lead was enrolled in the sequence.
You can unenroll a lead from the sequence by clicking on the three dots at the end of the row.
Emails & Activities timeline
Once a contact is enrolled in a Sequence, their progress can be tracked via a timeline that shows the steps completed:

Emails & Activities: Activities board
Once Sequences are published and in use, all tasks and activities generated by a Sequence are automatically synced with the Activities board. This allows you to filter and view specific tasks, such as calls that need to be made.
Editing Sequences
If you edit an active Sequence, all current runs of the Sequence and all enrollments in the Sequence will be terminated. For this reason, we recommend only editing active Sequences if absolutely necessary to avoid disrupting the customer journey.
Best practices
With that in mind, we recommend the following best practices:
Make sure that all teammates who have edit access to your Sequence are aware of this.
If you must edit a Sequence, check which steps are in progress and either allow the step to complete or move the contact or lead to a new Sequence before making changes.
In this case, you might also consider terminating the runs for the new contacts, and letting the contacts who have already begun the Sequence to complete it. After they complete the sequence, edit the sequence.
Note: If a Sequence fails (e.g. the email bounces), you will receive a notification and Sequences will terminate that instance for your lead or contact. Notifications will also cover successful completions of a Sequence and manual terminations.
How to edit
To edit a Sequence, open Sequences:

Open the three-dot menu and select View sequence:

Click Edit sequence in the top right corner to make changes:

When you're done making changes, click Save sequence in the top right corner.
Permissions
Currently, permissions are based on your role in the account. If you are--
admin. You can access and edit all sequences.
the sequence creator and owner. You can access and edit your sequences only.
an account member or viewer. You can view all sequences. You can't edit.
While there are no role-based restriction for viewing sequences, users will only be able to access and view sequences on the board-level if they have access to the board. Otherwise, they can view all sequences via the navigation on the left.
Automation actions
Email sequences uses some of your account's allotted automation actions. Each step in a sequence counts as an automation action.
For instance, if a sequence has five (5) steps, it will use five (5) automation actions plus one (1) additional action for completion.
Who can use this feature:
monday CRM members only
Available on Pro and Enterprise plans
💡 Stay tuned for more updates in the future!
👉👉Start your free trial with us today: www.achievan.com/mondaydotcom


Bình luận